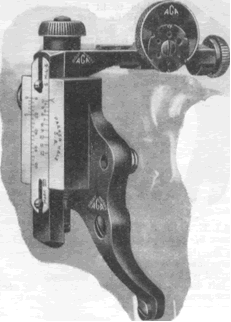
Chief attention must be accorded the Model 5A Sight in these brief notes, not because the No.1 rifle is the most commonly used, but because this rifle cannot be served with a sight that can be fitted by the simple removal and replacement of screws, etc. as in the case of the rifles No. 4 and 5, and also because the Model 5A is the forerunner of the aperture sight designed to fit the later types of rifle.

The illustration shows the sight fitted by means of screws A and C; the leg of the sight base between these fixing screws should be bent if necessary to make the sight assume a perfectly upright position. Check this by aligning the foresight and open backsight through the aperture first at 200 yards then at 1,000 yards elevations. If the foresight is fairly centred in the V-notch at both distances, without alteration of the windage adjustments, all is well. See that the screw A has a locking washer under its head before finally tightening it.
With the three sights correctly aligned at the 200 yards open sight elevation, lower the open sight out of the way, or fit a higher foresight if the cap obtrudes, and test on a calm day at 200 yards or on a zero target at a range of 71 ft. 7 ins. Move the elevation knob K and/or the windage knob H until the bullets group on the desired mark; then loosen the set screws G and W and move the scale plates so that the zero marks on the wind gauge coincide, and the arrow head on the elevation side points to the 200 mark on the scale plate P; carefully do up the set screws and the sight is then said to be “zeroed” . In theory, whenever your sight is set at 200 yards and zero for windage, your group should centre as originally set, but this is where theory and practice vary, and to avoid continual re-zeroing of sights it is better to mark down all sight adjustments in the spaces provided on each target diagram in your book, and for this reason it is desirable to learn how to read the Vernier scales. Firstly, know that each click of the adjusting knobs moves the eyepiece .005″. Two clicks, therefore, move the aperture .01″ and as the angle subtended by this movement in the length of the sight radius is nearly one minute, or one-sixtieth of a degree, it is customary to refer to each two clicks as “one minute.” If this were a true minute of angle, the movement on the target per 100 yards of range for each two clicks would be 1.047″, but as the angle is rather greater than one minute, this movement becomes nearly 1.2″ or 1-1/5″.
It will be obvious that the actual movement of the sight at each” click” of the knob is only .005″, so small that a Vernier scale is essential to discern the movement. Most sights are similar in this respect and the Model 5A illustrated, shows the moving elevation scale plate P has divisions on the left side 5/100″ apart; the fixed Vernier scale N has divisions 4/100″ apart. The diagram hereunder shows, by following the progress of the thickened lines, how each 5/100″ division is split into hundredths, or “minutes” as they are usually termed. Remember, however, that most sights are” half-minute clicking” and consequently the Vernier will not encompass the five minute movement in five clicks as illustrated, but ten clicks will be required.

To refer back now to the “zeroing” of the scale plates, let it be assumed that during the following 200 yards shoot the correct elevation under the prevailing conditions is not precisely on the first range mark, when the vernier reads between 2 and 3 minutes. Obviously it would be incorrect to set the range scale for the next range, say 500 yards, opposite this range mark without checking up on the actual rise required; it will be seen by reference to the chart on page 12 that the No.1 rifle requires 11 minutes (22 clicks), therefore, if the actual Vernier reading for 200 yards was 5 ½ minutes, the setting for the first sighting shot at 500 yards should show 16 ½ minutes, and the range scale should be temporarily ignored. On the other hand, if the actual elevation of the sight required for 200 yards happens to coincide precisely with the 200 yards mark on the range scale, then, without further reference, the sight may be reset at any other desired range with complete confidence, for the range scale gives the correct rises between ranges for Mark VII ammunition.
To simplify the adjustment of the sight slide and to make its complete removal or replacement easy, a spring loaded half-nut engages the elevation screw, and this can be clamped tightly by the spin-up nut U or, conversely, by slacking off and pressing this nut, the elevation screw is freed from engagement with the half nut and the whole slide assembly can be removed. No reference has yet been made as to the desirability or otherwise of making changes of elevation during the course of a shoot because this is a matter for personal choice. Generally speaking, however, it will be obvious to the novice that as he plots his individual shots, a group will be formed, the centre of which should, as speedily as possible and without wasting further ammunition, be brought to bear on the centre of the bulls-eye. Obviously too, the aperture sight has half minute clicking adjustments for both vertical and lateral movements, and with their aid and the assumption of a theoretically perfect rifle, held and fired perfectly, it should be possible after firing the first shot, to move the point of impact to any desired point on the target within the limits of a half minute of angle by instant reference to the” minute” squares on the target diagrams after the first shot has been accurately plotted. If all this assumed perfection could be realised in practice, of course; it would be easy to advise the novice exactly when and how to alter his sight adjustments, but the fact is there are so many variants quite apart from the elements that the best advice is: always make a group first, without sight changes; the first two shots are generally” sighters” anyway; if they go together and are outside the bull they can be called a trial group, and the movement necessary to bring the centre of this group to the centre of the bulls-eye should be made without hesitation. Should the third shot fail to strike the bulls-eye, before making any further change, the exact position of the group centre of these first three shots should be assessed as though no adjustment of the sights had been made; then make suitable corrections before the fourth shot is sent on its way, and so on. Since elevation at short ranges will be found more troublesome than lateral deflections, it will be found distinctly illuminating if the graphs printed at the sides of the target diagrams are entered up, ignoring the sight adjustments and plotting the points as though the string of shots had been fired with fixed sights.
It is a common fault of the novice to “chase his own errors,” or to imagine that one or two” clicks” are sufficient to account for a movement on the target that would not be covered by four or five” minutes.” Both these faults arise through the imaginary group centre being forgotten and the position of the last shot taking precedence in the shooter’s mind. It is equally misleading for the novice, or expert, to assume that every shot fired was perfectly let off, and to base his group centre calculations on this premise. If a novice is honest with himself and will get to know his own grouping capabilities, he will have gone a long way towards eliminating the chasing of his own errors.
POINTS TO MEMORISE.
(1) Move the eye-piece in the direction you wish to move your shot.
(2) Do not fire unless your sights appear the same each time. By moving the eye up and down and to and fro you will find a bright centre in the peep, through which the front sight blade will be seen clearly and distinctly. To find the best size of aperture to suit your vision, start small and open up until the target appears as bright as when viewed over the sights. Then stop down one size.
(3) To elevate, turn clockwise. To go left, turn anti-clockwise. To go right, turn clockwise.
(4) Use a yellow filter on dull or misty days and a green filter to tone down glare.
Note: all the PH sights have 1/100″ Vernier’s and with the SMLE 25.2″ barrel give approx. 1 1/5 inches per 100 yards for each minute of adjustment on the Vernier. Each “click” of elevation or windage will be half of one of these minutes. When you know the dimensions of your target face in minutes of angle it is easy to get the group in the centre of the bullseye For whatever target you are using, at whatever range,
You can make a plotting sheet by marking the scoring rings to scale then drawing a grid over the top. At 100 yards, the (minute) grid is 1.2″ apart on the target face for the Parker Hale sights. At 200 yards it is a 2.4″ grid, at 300 yards 3.6″, 400 yards 4.8″ etc. As above, always think in terms of group centre, do not adjust on individual shots.

